8 Steps to Boost a Smarter Design Process for Creative Projects
Last Updated on March 8, 2024 by Ilka Perea Hernández
Designing can be overly complex and demanding if you don’t know where to start. Besides, coordination among you and the rest of the players in the process and managing resources efficiently will be priorities for developing and completing the design project. Following and applying these steps can boost a smarter design process.
One of the most subjective design concepts is the definition of what “design” is. Design is often considered to be the product. It is what users consume, use, and feel.
The subjective nature of a design makes its development chaotic. Even more so, if designers are not clear about the purpose of the design, the needs to be satisfied, or the problems to be solved. The steps within the design process are so specific that they resemble a roadmap that guides the designer through the process to achieve a final product that guarantees exceptional user satisfaction.
In this post, I will define what a design process is, explain its purpose and benefits, and finally, detail each of the steps that will allow each designer to boost a smarter design process for their projects.
Table of Content
- Design Process
- What is a Design Process?
- Advantages of Following a Design Process
- Design Process Steps
- Step 1: Problem Definition
- Recognize the Needs
- Flag the Constraints
- Step 2: Research and Information Gathering
- Methods of Design Exploration
- Listen Carefully
- Know the User
- Know the Competitors
- Know the Market
- Step 3: Ideas Sourcing and Analysis
- Individual Brainstorming vs. Group Brainstorming
- Brainstorming Techniques
- Convergent and Divergent Thinking
- SWOT
- Selecting an Approach
- Step 4: Proposal Development
- Sketching
- Concept Design
- Detailed Design
- Moodboard
- Intellectual Property
- Step 5: Prototyping
- Step 6: Testing and Evaluation
- Evaluation Tools
- Step 7: Adjustments and Improvements
- Step 8: Final Delivery
- The Right Provider
- Summary
- Some Insights
- Sustainability
- Any Thoughts?
Design Process
What is a Design Process?
The design process is a method of satisfying certain needs or solving a problem through the implementation of phases and steps. In other words, the design process is the breaking down of a large project into smaller and more manageable parts with very defined tasks that are performed in a specific order.
With this in mind, each of these phases requires decision-making in which resources are optimally deployed to achieve the previously defined objectives: solving a problem or satisfying a need. In this context, it is important to emphasize the term “optimal”. Boosting a smarter design process is about achieving objectives and doing so efficiently throughout the development of the design project.
Advantages of Following a Design Process
The main purpose of the design process is to provide a guideline to ensure that the development of the design project meets all requirements from start to finish. Therefore, its implementation provides the following benefits:
- Pinpointing Problems: it makes it possible to identify a problem, flag it up in time, and apply the most viable solution.
- Efficiency: It also makes the design and production process less complicated and more cost-effective.
- Time Savings: Time is a limited resource that must be managed wisely throughout the development of the project. Time, in design, translates into money. Therefore, any designer will try to optimize the time spent on each task within the project. Applying the design process will contribute to this optimization.
- Task Focus: Likewise, human resources will also benefit from this optimization. The members of the team know their roles and will be focused on accomplishing the tasks assigned in a schedule by effectively tracking the project’s progression.
This design process is used by creatives in different areas of design such as architecture, interior design, urban planning, graphic design, fashion design, pattern making, or web design, with the purpose of defining the required steps to address each type of design project.
Design Process Steps
Breaking down the Process
Think about the project you are going to start. For better control and optimization, we divide it into four phases or stages. In turn, these phases will be subdivided into tasks or steps.
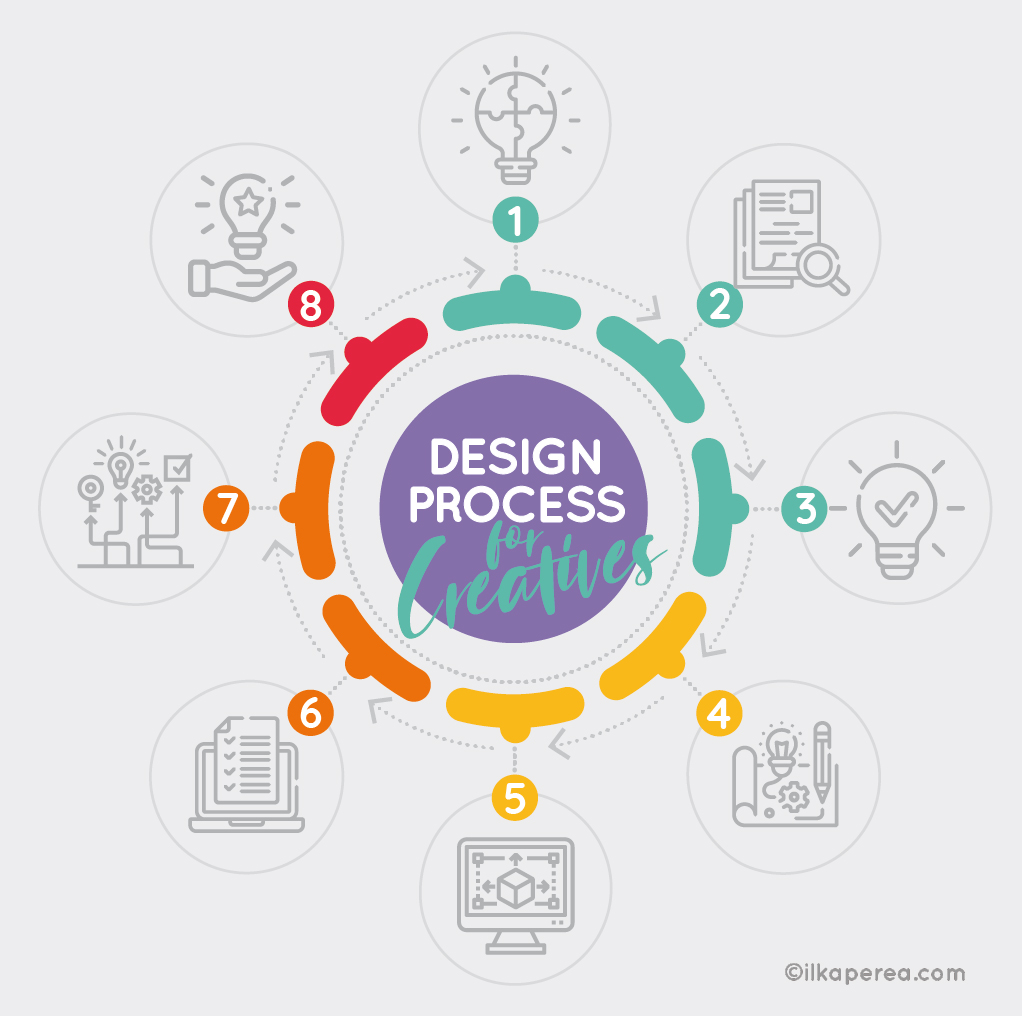
To boost a smarter design process, you should follow the following plan:
- Definition Phase
- 1: Problem Definition
- 2: Research and Information Gathering
- 3: Ideas Sourcing and Analysis
- Development Phase
- 4: Proposal Development
- 5: Prototyping
- Evaluation Phase
- 6: Testing and Evaluation
- 7: Adjustments and Improvements
- Implementation Phase
- 8: Delivery
Step 1: Problem Definition
To start developing relevant, meaningful, and functional designs:
- First, recognize the real need or problem.
- Second, identify the requirements and opportunities to satisfy that need or to solve that problem.
For this reason, this first step requires that, as a designer, you answer certain questions to decide what the specific need is, what the objectives for the project are, who has that need, and why it should be solved. The client can answer these questions when delivering the project design brief.
A design brief is a document that defines the goals, scope, and strategy of the upcoming design project. In other words, it is a blueprint with details about the overall workflow of the project, from conception to completion.
Recognize the Needs
Recognizing user problems or needs can be considered an objective and subjective exercise. Needs can be assumed, as the outcome of perception. In contrast, there are cases of very tangible because of proven user dissatisfaction. Likewise, what is presumed to be a need may be only a symptom of a larger problem.
In either case, a solution cannot be found until there is a clear and real idea of what the need or problem is and whether the development of a design solution is justified. A good exercise would be to locate what is considered a “need” within Maslow’s Hierarchy of Needs to define exactly what the problem is.
Flag the Constraints
In this step, you must define the restrictions, limitations, or constraints. These can be both internal constraints, which are inherent to the design process, as well as external constraints. For instance, signatures for approval or disbursement of the design printing budget may delay the design process. External constraints include the manufacturing or printing processes viable, market standardizations, and the available materials.
For example, these key questions will make it easier for designers to define the problem to boost a smarter design process.
Problem Key Questions
- What is the problem or need that this product or service will address?
- What are the symptoms of the problem?
- Who is the end-user of this product or service?
- Who else is affected?
- What are the main goals of this project?
- How will this product address the problem or need?
- What resources will it require to complete this project?
Step 2: Research and Information Gathering
At this stage, designers should continue to collect information related to the responses obtained in the previous stage. Data on competition, consumer behavior, and market trends should be collected.
At this point, it is worthwhile to review the design brief again to extract all relevant information such as quantitative and qualitative data on the market, customer segmentation, competitors, and target group.
Methods of Design Exploration
A lot of information can be captured and analyzed by following the methods of design exploration:
- Brand Positioning Matrix
- Mind Maps
- Visual Documentation
- Discussion Groups or Focus Groups
- Interviews
- Creative Briefing
- Brainstorming
Listen Carefully
It is always a clever idea to learn from the experiences of others. The client can provide truly relevant insights that may not be written in the brief.
Conducting a formal interview can open that channel of communication for the client to provide more details. A simple, informal, and pleasant conversation may provide a more relaxed environment for the client to comment with ease and confidence on certain sensitive or overlooked information that may be of great relevance to the development of the design.
Whether in a formal or informal mood, the designers need to listen attentively and patiently to everything that the interlocutor is willing to comment on.
Know the User
It should be clear that the design is not for the client but for the end user. In this sense, designers can organize a meeting with users to learn more about their mindset, expectations, habits, and preferences. In this context, user personas are fictional yet realistic representatives or archetypes of the key user groups to help the designers empathize with them and design a product or service that is most suitable for the users.
It is almost impossible to create a design that meets everyone’s needs, so it is important to know the end-user of the product or service. In fact, broad and detailed market segmentation is required to obtain a true picture of the user.
A good strategy is to obtain data from:
- demographic segmentation (the who)
- psychological segmentation (the why)
- geographic segmentation (the where)
- behavioral segmentation (the how)
All these data sets provide relevant information about the conditions and expectations that the design must meet to satisfy the end user.
Likewise, life stage segmentation also expands on the demographic approach. This study includes users’ factors such as marital status, homeownership, and whether they have children (considering their ages).
User Key Questions
- What is the age or age range of the user?
- What is the user’s gender?
- Where does the user live (country, region, urban or rural, etc.)?
- In what conditions does the user live (live alone or with parents, own or rent, apartment, or house, with pets, etc.)?
- What is their level of education?
- Where do they buy related products or use a similar service?
- How often does the user buy a similar product or use a similar service?
- How often will the user use this product or service?
Know the Competitors
The goal of this stage is also to learn more about competitors. The designs of rivals can be a useful source of inspiration. The idea is not to copy them but to take note of pain points and successful results. The purpose of analyzing the competition is to know what is already on the market and what values you can bring better than them.
For this assignment, you can research on:
- Competitor’s website or blog: Look closely at the content and the look & feel (logo, corporate colors, imagery, etc.). Check SimilarWeb.com.
- Social media channels (such as Facebook, YouTube, and LinkedIn): It’s not just about following them on social media and seeing their posts. You should read comments from followers or users of the product or service.
- Print ads and specialized magazines: Advertisements and reports in specialized magazines can also yield valuable information about the competition.
Know the Market
Users of a product or service make hundreds of decisions every day. Finding out the reasons why a user chooses a product from among many others in the market or why they prefer service from others is crucial to the design project.
Some of the tangible reasons why a user makes decisions in the marketplace may be price, quality, or warranty; but a user will not accept a product that does not work or a service that is useless. Besides, designers should consider the classification of direct competition, substitute products, or similar products.
To this effect, designers should consider these key questions to boost a smarter design process with clever data about the market.
Market Key Questions
- Are there similar products or services on the market?
- How do users typically obtain a similar product or service?
- What can be changed to improve the existing product or service?
- What is the unique value proposition of this product or service?
- How will this design be better than other similar products or services in the market?
Step 3: Ideas Sourcing and Analysis
Once the information has been collected, designers can use different exploratory methods to generate ideas. One of the most recommended is Brainstorming.
For decades, people have used brainstorming to generate ideas and produce creative solutions to problems. Brainstorming combines lateral thinking and an informal approach to problem-solving while encouraging people to generate ideas that might be considered absurd, crazy, or bizarre.
This process generates original and highly creative ideas and these ideas generate more ideas. Despite its informality, brainstorming requires an open-minded and unbiased approach. Otherwise, this exercise becomes apathetic, boring, and unproductive.
Individual Brainstorming vs. Group Brainstorming
Although group brainstorming is often recommended because “two heads are better than one”, several types of research have shown that individual brainstorming produces more and better ideas than group brainstorming. This happens because individually people do not feel shame, embarrassment, or introversion to generate crazy and daring ideas, which sometimes does not happen when they must share their wild ideas with others, especially if it is in a workgroup.
On the other hand, the group must be highly tolerant and respectful so that all members feel the confidence to share their crazy ideas. In addition, in a group, you must wait for a turn to speak, which sometimes causes the idea to be forgotten since the idea was not expressed at that moment. In these cases, it is suggested to write down the idea on paper right away to be remembered and shared.
Brainstorming Techniques
- Reverse Brainstorming improves a product or service. Also called Negative Brainstorming is an ideal technique for finding solutions by doing exactly the opposite of what is expected. Instead of asking for solutions to the defined problem, you ask them instead to express the ways to undermine the design or make a problem impossible to solve by citing all those creative actions that could directly lead the design to failure.
- A sticky-note map is a tool where individuals jot down quick thoughts of only one or two words. They are then attached to a blank space and linked to another idea.
- Starbursting helps the team develop the questions they need to ask to evaluate a proposal. The questions are: Who? What? When? Where? Why?, and How?
- Write with the Off-Hand. This technique changes the point of view. The goal seeks to use the non-dominant hand to use a different part of the brain and spark some creativity.
- Rolestorming encourages group members to assume the identity of other people during brainstorming, thus reducing their inhibitions. While brainstorming is a process, Rolestorming is more like a game. In fact, members impersonate anyone from a difficult and demanding client to a superhero or supervillain. The sky is the limit.
Convergent and Divergent Thinking
The process of devising a concrete solution to any problem is called Convergent Thinking. Divergent thinking is the thought process that explores multiple viable solutions to generate creative ideas.
While convergent thinking goes through a straightforward process that focuses on figuring out the most effective answer to a problem, divergent thinking refers to opening the mind in various directions and trying out multiple solutions for a problem. Convergent thinking is often used in conjunction with divergent thinking.
SWOT
SWOT presents an analysis of strengths, opportunities, weaknesses, and threats — the pillars that give context to the resulting analysis. In this regard, a SWOT analysis provides valuable information to create different scenarios and proposals that will be approved, discarded, or expanded according to previously established feasibility criteria.
Analysis Key Questions
- What are all the practical solutions?
- Where will the users be using the design?
- How will the user use the design?
- Will the design be upgraded?
- How could the design be improved?
- How can design turn its strengths into opportunities?
Selecting an Approach
It is time to evaluate ideas and further explore solutions using conventional approaches. Consequently, all those crazy and unbelievable ideas should be gradually converted into more real and concrete proposals. Designers must check the alignment between the selected idea and the project criteria and constraints previously outlined. Indeed, this stage is not only worked on in words but also graphically by making the first sketches.
Step 4: Proposal Development
From this step, we are in the production stage, which is the stage that designers are most familiar with and is my favorite stage.
Sketching
Brainstorming has generated many concepts and suggestions about the best features of the product or service being designed. It’s time to prioritize those approached ideas and start sketching. During this step, designers begin sketching, drawing, and previewing to begin to understand how all the data and information that has been gathered may affect the design. To the matter, it is necessary to gather team members to discuss, debate, and discard ideas.
It is good practice to choose two or three of the best ideas and develop them through detailed and annotated sketches. In addition, designers must determine the types of materials from which the design will be developed or manufactured. All these steps will help you develop your ideas and reveal which of them are most likely to succeed.
Concept Design
A design concept is the main idea that drives the design of a product and is explained through a collection of sketches, images, and a written statement. At this stage, designers think in broad terms, without going into technical details. The visual elements of a design concept include basic sketches and renderings, product style, identity, materials, shape factor, mechanics, and basic functionality, which help demonstrate how users will interact with the design.
Designers explore multiple design options to determine the most effective and user-friendly structure and aesthetics. The more ideas and fewer perceived technical limitations, the better the conceptual design process. It’s innovation without limits.
Detailed Design
At this phase, the scope of the design is tightened. It is also the point at which the cold, hard truths of what is and is not possible are explored.
During the detailed design process, designers consider looseness, manufacturability, tolerances, and customer perception. The extensive ideas of the concept phase are treated with a much more critical eye. Detailed design cannot exist without concept design, but it is where only the most practical and market-appealing ideas make it to the prototype stage.
Moodboard
It is a collection of thoughts that point to designs that the users, clients, or industry likes. It is a tool that helps you refine your visual ideas at the beginning of a creative project. You will be able to develop a visual vocabulary or sense of focus with a successful mood board. Building an accurate Moodboard will boost a smart design process reaching the goals of the project faster. For example, Pinterest and Behance provide options to create moodboards by subject.
Intellectual Property
During the production stage, designers should consider intellectual property protection. If the design product is for a company, they may have legal counsel and have this covered.
But if the design project is an independent work in which the designers develop a product of their own, they should consult with an attorney and consider a legally binding contract, or commercial agreement, to legally protect their ideas or innovative design.
In addition, it must be determined whether these innovative ideas are categorized as copyrights, trademarks, or patents.
Step 5: Prototyping
With no time for further delays, it’s time to create scale models or mockups — a functional prototype. Roughly speaking, and depending on the area of design, a prototype is a physical or digital representation of the final design but retains the most relevant features that are intended to be developed, albeit in a simplified form. Making concepts tangible with rapid prototypes and testing them as soon as possible saves a lot of time and resources. The goal is to find functionality problems before starting with the final designs.
On the other hand, prototypes provide the opportunity to test the design and receive constructive feedback. They represent also a low-risk way to show a proof of concept to convince the client or to gauge end-user interest in a Focus Group Discussion.
Again, depending on the design area, CAD can be a smart choice for prototyping. In this sense, the CAD model allows the customer to further evaluate the design, give final approval for production, and quickly bring these designs into the physical environment.
Step 6: Testing and Evaluation
Prototyping is iterative. Feedback creates changes to the model that are then produced in an updated version and retested. Unexpected problems may arise that will need to be resolved.
Most of the time, it is possible to create working presentation prototypes with mock-up materials that look like the real thing. Often, you can integrate emotional feedback into the color palettes you intend to use. Through further evaluation, you can decide on the one that is most likely to achieve the objectives set out in your brief.
An effective way to gather feedback is to organize a focus group where people try out the design and comment on whether it is easy to understand and use. Create a decision matrix, in which you set out the essential aspects to validate and weigh. A selection of concepts can be evaluated by placing this set of must-haves in a matrix.
Each concept will be scored based on how well it satisfies the corresponding specification. Weighting helps you sum up how a concept has fared overall. During the design evaluation process, this matrix can be a useful guide.
Evaluation Tools
Most evaluations require the use of a data collection and weighting tool: the Evaluation Instrument. To develop an evaluation instrument, designers must establish the aspects to be validated and propose a rating level to score these aspects. For this purpose, designers should refer to the design project’s original goals and identify the core factors that should be measured.
Evaluation Key Questions
- Does the design solve the problem?
- Does the design satisfy the need?
- Do the users understand the design?
- Is the design easy to use?
- What are the knowledge gaps?
- What criteria need to be improved or redesigned?
Step 7: Adjustments and Improvements
When the designers have used, reviewed, and evaluated the prototype, they will receive feedback about how the design has solved the original problem. The feedback from the focus group and the conclusions derived from the evaluation instrument will be crucial in developing the next version of the design.
Then designers will understand what needs to be adjusted, why the adjustments are necessary, and how an updated version will better serve the needs of the end-user and stand up to the competition in the future.
Step 8: Final Delivery
Time to deliver and present the design through oral presentations with visual aids or by written manual with appropriate graphic documentation (charts, graphs, technical drawings, renderings, etc.).
The Right Provider
For the implementation of the design, it is crucial to find and collaborate with a builder, manufacturer, or printer that suits the requirements of the design and the allocated budget.
First, decide whether you want to produce locally or overseas, as each will have its own pros and cons. Designers should consider the lead times of the manufacturer or printers to plan the production process, as they can sometimes cause delays and affect deliveries.
For references, designers can look for information on social networks where customers and users write reviews about the services received. Another much more reliable source is the network of small businesses in your industry, as these people will have valuable first-hand experience.
Second, select the builder, manufacturer, or printer. Once the designers have researched which manufacturers may be best, they should start narrowing down the list by comparing prices, timelines, and production processes.
Summary
- The design process is a method of satisfying certain needs or solving a problem through the implementation of phases and steps.
- The design process provides the following benefits:
pinpointing problems, efficiency, time savings, and task focus. - This process follows these tasks or steps: Definition Phase (Problem Definition, Research and Information Gathering, Ideas Sourcing and Analysis), Development Phase (Proposal Development, Prototyping),
Evaluation Phase (Testing and Evaluation, Adjustments and Improvements), Implementation and Delivery.
Some Insights
This scheme that I present here to promote a more efficient design process is a humble proposal with which I try in a general way to offer an alternative to developing creative projects in different areas of design based on my own experience as a designer.
The main areas I considered are spatial (architecture, interior design, etc.), product (textile design, product design), and communication (graphic design). With this in mind, each designer should adjust this scheme to his or her own design field and the type of design project he or she is working on.
Sustainability
One concept that all designers should agree on, regardless of our field of expertise, is sustainability in design. Designers should learn about the characteristics of sustainable design, incorporate them into the steps to boost a smarter design process, and develop environmentally friendly projects.
Any Thoughts?
In the comments section, tell me if you already knew these steps of the design process. Which of these steps do you follow most often? Which ones don’t you follow, and why? Do they take too much time? Are they complicated? Do you practice sustainable design?

Share
Spread the love… and this post!
If you liked it, share this post on your social networks. Smart designers share good things with others.
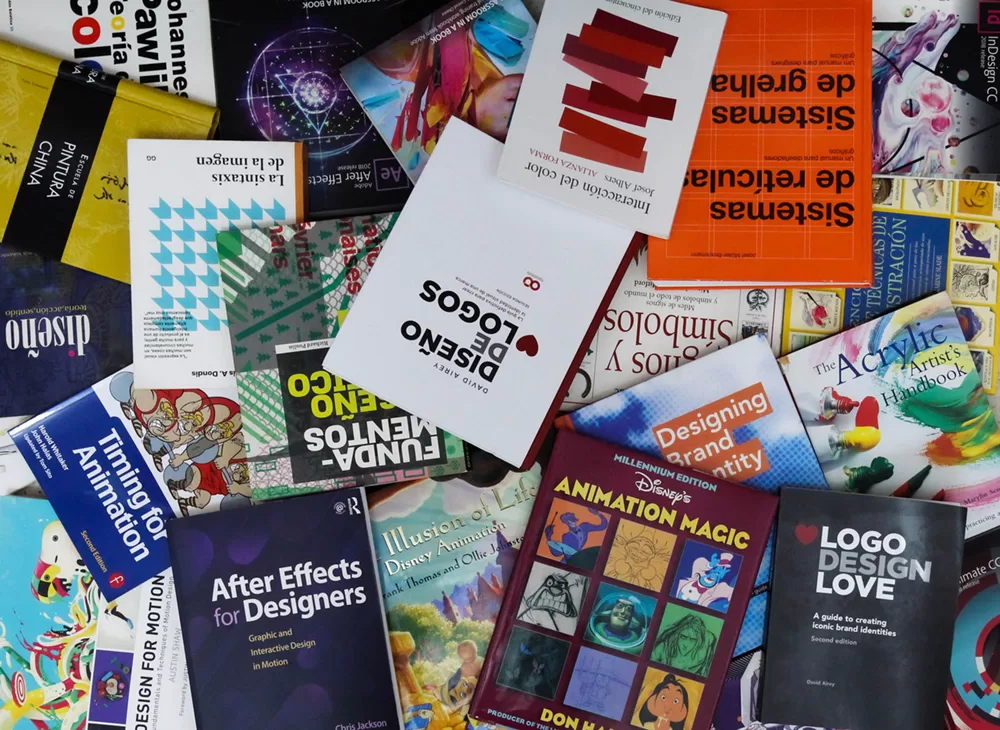
Bibliography
- Campi, I. (2020). ¿Qué es el diseño? Editorial Gustavo Gili.
- Dabner, D., Stewart, S., Vickress, A. (2020). Graphic Design School: The Principles and Practice of Graphic Design (7th ed.). Wiley.
- Lupton, E. (2011). Graphic Design Thinking: Beyond Brainstorming. Princeton Architectural Press.
- Malamed, C. (2009). Visual Language for Designers: Principles for Creating Graphics That People Understand. Rockport Publishers.
- Visocky O’Grady, J.; Visocky O’Grady, K. (2017). A Designer’s Research Manual (2nd ed.). Rockport Publishers.
