
The Power of Chiaroscuro and How to Take Artistic Dark Food Photography
Last Updated on July 24, 2024 by Ilka Perea Hernández
Dark food photography is one of the latest trends in photography, although the chiaroscuro style is not so new. Chiaroscuro is a well-known style in the field of fine art painting. Learn more about the power of chiaroscuro and how to apply it in food photography to create your own masterpiece.
Chiaroscuro is a widely known style used in artistic painting. In graphic design, we use chiaroscuro to create images with high contrasts. The contrast of colors and visual tension are two basic concepts in graphic design widely used as an aesthetic resource and communicates emotion or mood. In photography, the sharp contrast of light and shadow creates an extremely dramatic atmosphere that evokes emotions in the viewer. Graphic designers can exploit this communicative ability if they know how to apply chiaroscuro in their photographs.
This post explains the chiaroscuro style, presents background information, and provides suggestions for applying it to food photography.
Table of Contents
- What is Chiaroscuro?
- Meaning of Chiaroscuro
- Origins of Chiaroscuro
- The Power of Chiaroscuro
- Chiaroscuro in Photography
- Dark Food Photography
- How to Take Dark Food Photography?
- 1. Choose a Topic
- 2. Choose a dark environment
- 3. Set up one light source
- 4. Place the camera
- 5. Set up the camera
- 6. Consider some extra support
- Some Insights
What is Chiaroscuro?
Meaning of Chiaroscuro
The term chiaroscuro comes from the Italian words Chiaro (“light” or “bright”) and oscuro (“dark”) and refers to the composition of light and shadow in a work of art. In a broad sense, chiaroscuro refers to using light and shadow to create the illusion of volume and depth on flat surfaces.
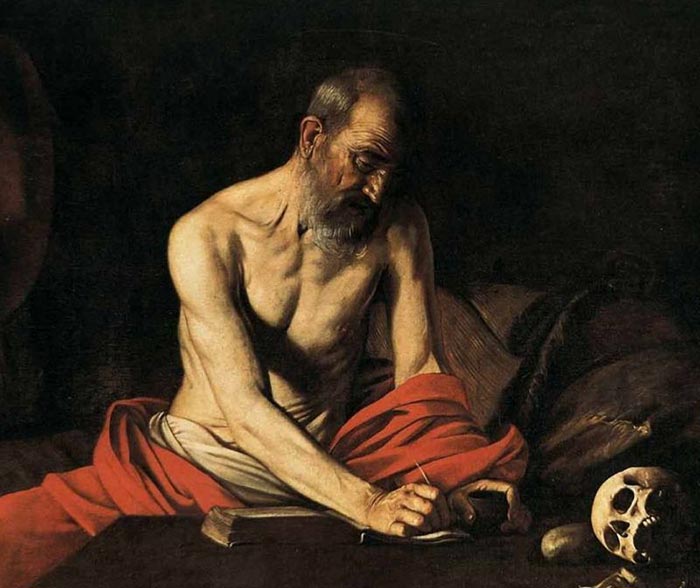
This technique of emphasizing the contrast between light and shadow in painting became so prominent that it became a style. One of the artists who adopted the chiaroscuro style was Leonardo da Vinci.
Origins of Chiaroscuro
Chiaroscuro can be traced back to Greece, where a Greek painter named Apollodorus Skiagraphos used hatched shadows to imply volume. However, it was not until the Renaissance period that chiaroscuro was developed and exploited by the artists of the time. The first Renaissance expert to develop a true chiaroscuro technique was Leonardo da Vinci.
Chiaroscuro reaches its zenith with Caravaggio. During the 17th century, Italian painter Michelangelo Merisi da Caravaggio combines high contrasts with a single focused light source to achieve incredibly dramatic effects in his paintings taking chiaroscuro to the extreme.
The same principles used for chiaroscuro paintings can be applied to photography.
The Power of Chiaroscuro
Chiaroscuro in Photography
Chiaroscuro is applied in portrait photography to create a powerful individual effect revealing the body structure and the character of the model. In the case of still life or food photography, it can be used to create a painterly effect to evoke concepts such as artistic and classical, vintage, and wistful, glamorous, or luxurious.
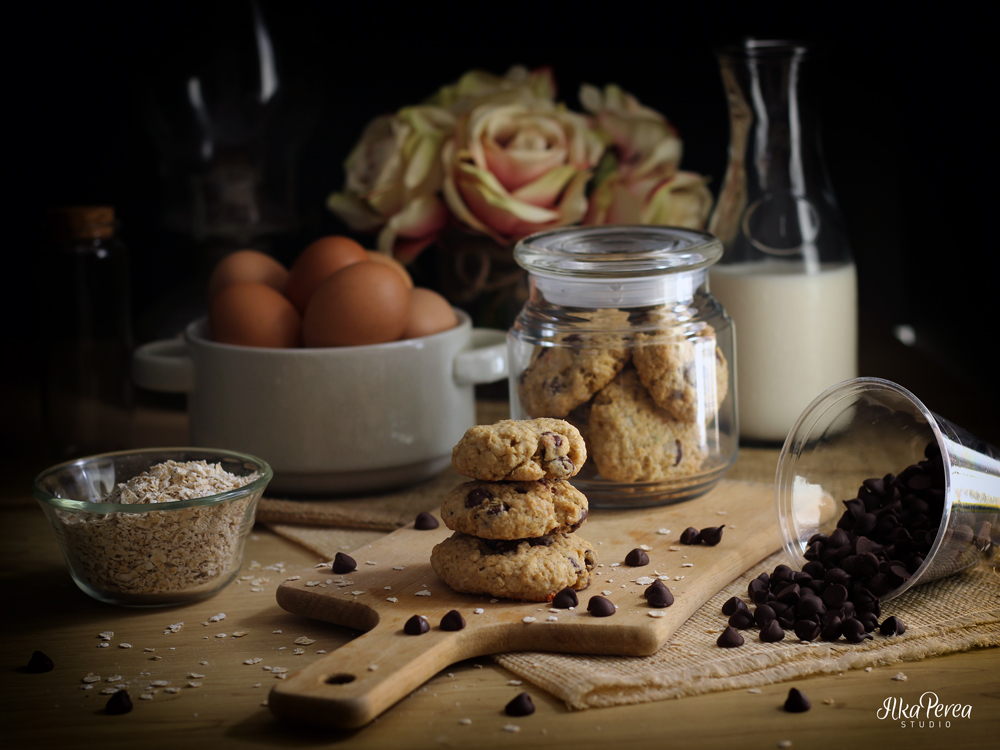
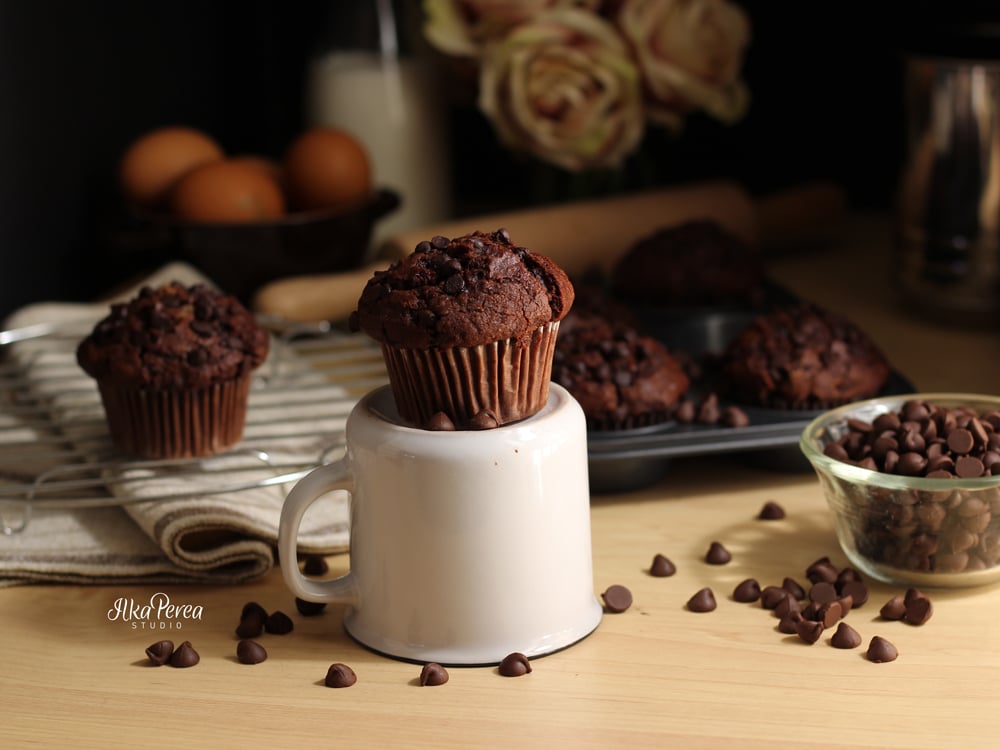
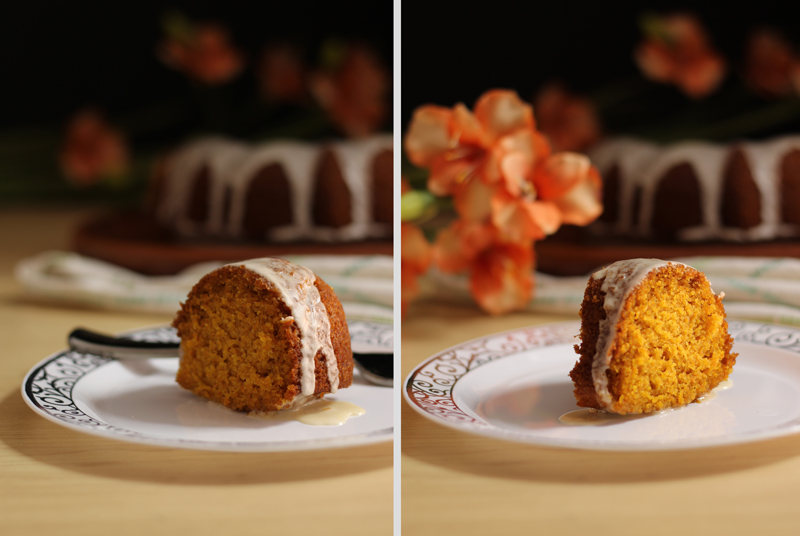
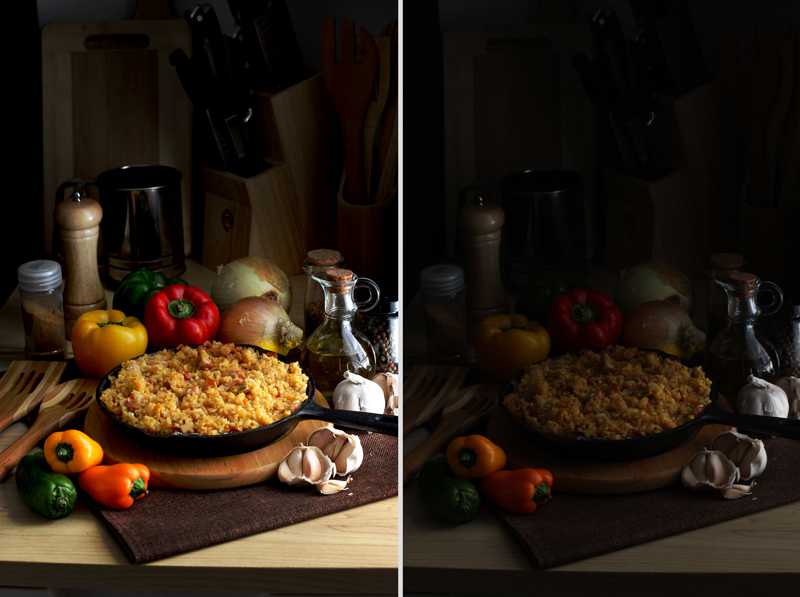
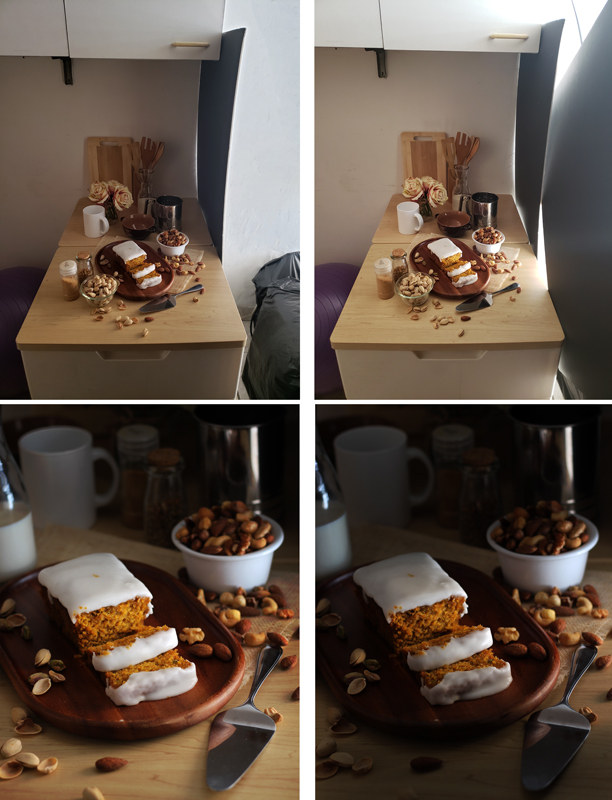
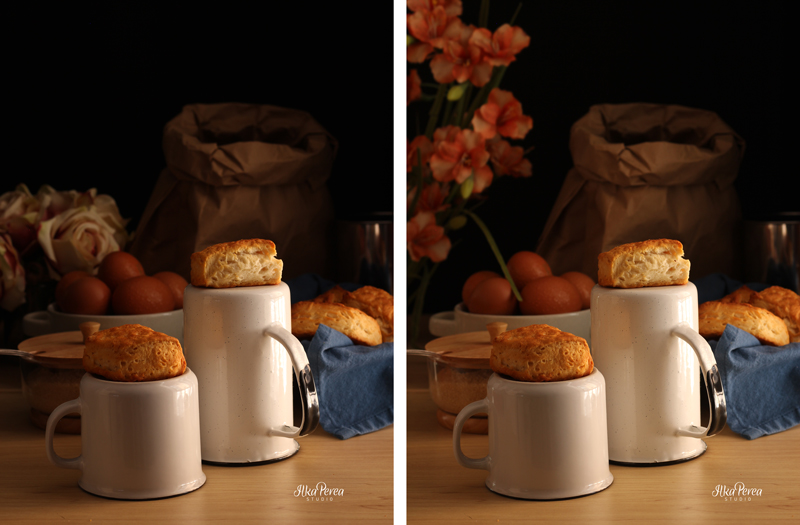
Dark Food Photography
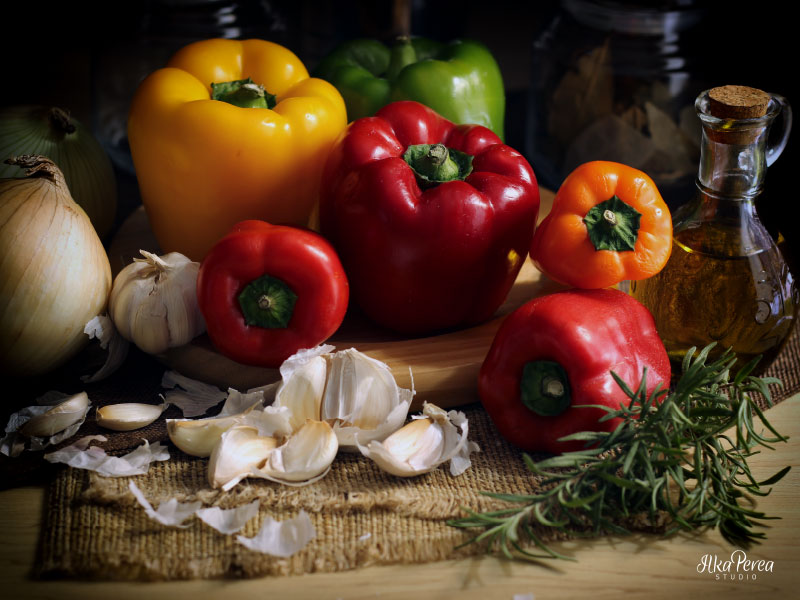
Like the European old masters, photographers use the skillful play of intense light and shadow to clearly model the dishes and ingredients and highlight their appearance. How? Often darkening large parts of the background and intensely illuminating large foreground objects.
How to Take Dark Food Photography?
Go ahead and unleash the power of chiaroscuro when you take your next food photograph by following these steps:
1. Choose a Topic
Anyone who follows me on Instagram (@ilkapereastudio) knows how much I love desserts, especially cupcakes. Which topic do you like the most? Pasta, seafood, salads, cocktails, grilled food… So firstly, choose the topic you are most enthusiastic about. Secondly, pick the object for your photograph.
2. Choose a dark environment
Find a dark location where you can control the light source. If you have access to a photo studio, that would be ideal, but if not, you can set it up in a dimly lit room. Further, reflective objects such as mirrors or surfaces with intensely bright colors should be removed. Remember that light reflects and bounces off, which will affect the photograph.
3. Set up one light source
Some photographers use two light sources, but I suggest using only one to get an actual chiaroscuro effect like in paintings. You will also have to decide between using natural light or artificial light. With artificial light, you have more control, as you can set the speed light for intensity, direction, and proximity to the object. I prefer to use natural light when it comes to food photography. Natural light favors the warmth I like to capture in my photographs.

Of course, this type of light presents certain challenges: you can only work during daylight hours, cloudy days are not favorable, and there are partly cloudy days whose light intensity changes from minute to minute forcing the photographer to adjust the shutter speed… this happens to me often.
Our eyes are always naturally drawn to the light. Therefore, we should try to place the main object of the photo on the side with the best lighting. In this way, the light should be projected horizontally to achieve greater contrast between objects and create the effect of volume. Sometimes it is necessary to change the position of the main object to highlight a particular aspect or enhance its appearance: its texture, its color, to make it look more appetizing, or more dramatic.
4. Place the camera
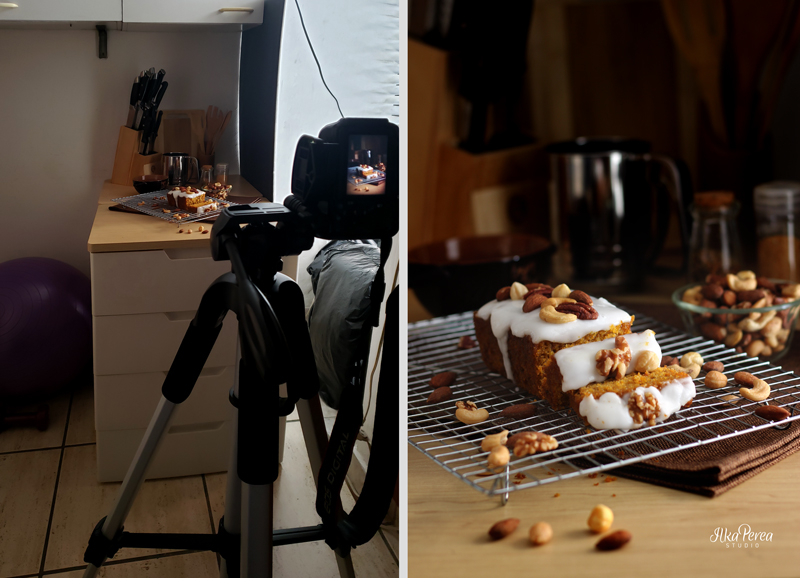
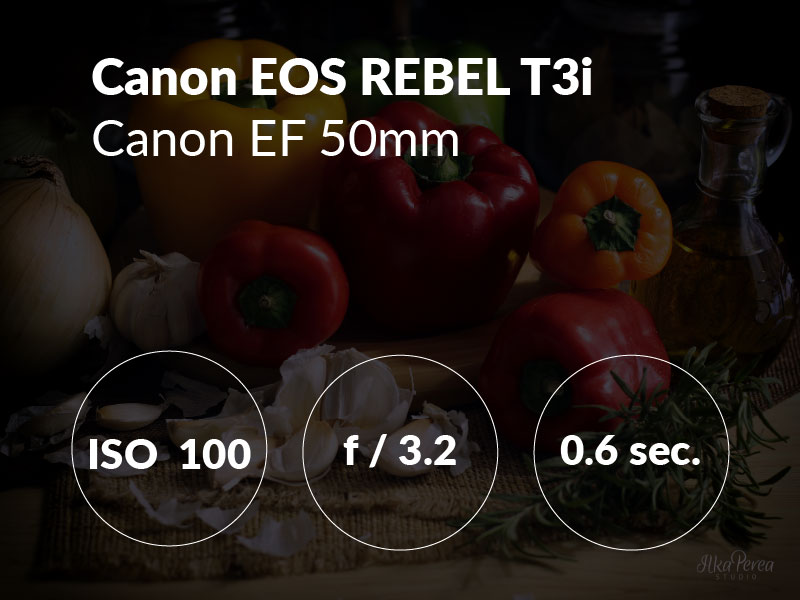
Position the camera at an angle perpendicular to the light source. Regardless of the type of light used (natural or artificial), I advise using a tripod to avoid shaking during shooting. Likewise, I suggest using a timer or remote shutter release. This helps prevent any shaking or wobbling of the hands while shooting. I usually use the self-timer for 2 seconds.
5. Set up the camera
The next step is to adjust the white balance and the exposure triangle — aperture, shutter speed, and ISO. The white balance must be adjusted according to the type of light chosen in step 3. Personally, I use Daylight Mode (5000K – 6500K). Regarding the exposure triangle, I like to work with ISO 100 or 200 to avoid noise in the photo. I often use an aperture larger than f/5.6 to play with depth of field. Consequently, I can only experiment with slower shutter speeds.
Be careful with the exposure of the photo. The photo can be underexposed to create more impact and drama, but you lose light and contrast if you overdo it.
6. Consider some extra support
Sometimes hacks are required to improve our work during the photo shoot. For example, a small lightbox from a cardboard box with black interiors and a small hole into one side where the light can seep in.
It is also possible to achieve a similar effect with three black cardboard boxes allowing the light to shine only on the front side.
In addition, the intensity and direction of the light can be manipulated by adjusting the position of the black cardboard to intensify the mood.
Props in food photography are details that should not be underestimated. They can contribute or detract from the result of the photograph depending on how carefully you choose them. To take advantage of the power of chiaroscuro in food photography, I recommend using dark props or accessories that do not stand out more than the main object of the photograph. Try different accessories until you get the desired result.
Some Insights
Once the photo shoot is finished you could try to develop your food photographs in Adobe Lightroom or Photoshop. Depending on what, as a graphic designer, you want to communicate in your photos, you could add vignettes, adjust the lights and shadows, or intensify their mood.
Exploiting the power of chiaroscuro for food photography requires quite a lot of practice and experimentation. You can try to change the intensity of the light and its proximity to the object to achieve different effects, subtle shades of light and shadow, visual impact, and drama.
In conclusion, this technique is useful for creating interesting food photographs with a highly artistic touch as well as for learning how the camera registers light and shadow within a composition.
Comparte
Difunde el amor… ¡y este post!
Si te ha gustado, comparte este post en tus redes sociales. Los mejores diseñadores comparten lo bueno con los demás.
Bibliography
- Dabner, D., Stewart, S., Vickress, A. (2020). Graphic Design School: The Principles and Practice of Graphic Design (7th ed.). Wiley.
- Jacobs, T. S. (2014). Light for the Artist (Dover Art Instruction). Dover Publications.
- Poulin, R. (2018). The Language of Graphic Design Revised and Updated: An illustrated handbook for understanding fundamental design principles. Rockport Publishers.
- Robinson, H. P. (2018). Pictorial Effect In Photography: Being Hints On Composition And Chiaroscuro For Photographers. Franklin Classics.
- Vivaldo, D.; Flannigan, C. (2017). The Food Stylist’s Handbook: Hundreds of Media Styling Tips, Tricks, and Secrets for Chefs, Artists, Bloggers, and Food Lovers. Skyhorse.